swiperの導入
前回作ったアプリを元に、swiperを導入してみようと思います。
swiperとは
スライダーが作れるJavaScriptのライブラリです。
こんなやつです。よく見ますよね。
導入
いくつか方法があるようですが僕はyarnを使いました。
yarn自体のインストール方法は省略します。
yarn add swiper
を実行するとpackage.jsonというファイルに
  "dependencies": {
    "swiper": "^6.8.1"
  },
このような記載が増えていると思います。
yarn install
でインストールするとnode_modulesというディレクトリにswiperに関するファイルが追加されます。
ファイルの読み込み
必要なファイルをapplication.js、application.css.scssで読み込みます。
// application.js

//= require jquery
//= require swiper/swiper-bundle.js
swiperはjquery不要、という記事を見たんですがやり方がわからず、jqueryを入れたら動きました。
なのでGemfileにgem 'jquery-rails'を追加してbundle installします。(変なタイミングですんません)
/* application.css.scss */

@import 'swiper/swiper-bundle';
あとはpathを通すための設定をしておきます。
# config/initializers/assets.rb

Rails.application.config.assets.paths << Rails.root.join('node_modules')
コードを記述
準備ができたので実際にコードを書いていきます。
公式にも見本のコードがありますが、こちらのサイトが分かりやすかったので参考にさせていただいてます。
slim形式にしてviewファイルの表示したい箇所に記述します。
また、今回はJavaScriptのコード量が少ないのでここに一緒に書いてしまいます。
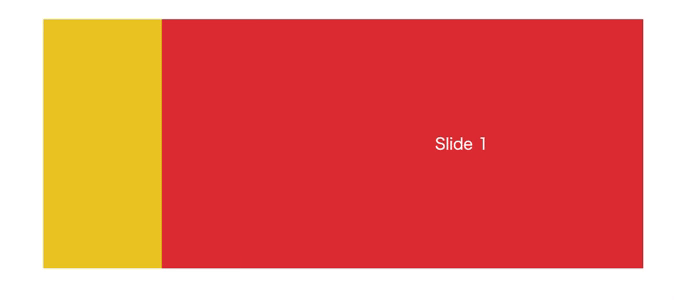
# show.html.slim

.swiper-container
  .swiper-wrapper
    .swiper-slide
      | Slide 1
    .swiper-slide
      | Slide 2
    .swiper-slide
      | Slide 3
    .swiper-slide
      | Slide 4

javascript:
  $(document).ready(function() {
    new Swiper('.swiper-container', {
      loop: true,
      autoplay: {
        delay: 1000,
      },
    })
  })
loop、autoplay以外にも色々できるので公式のDemosのページを見ていただけると良いかと思います。
/* application.css.scss */

.swiper-container {
  width: 600px;
  height: 300px;
}
 /* 全体のスタイル */
.swiper-wrapper {
    width: 100%;
    height: 250px;
}
/* 全スライド共通スタイル */
.swiper-slide {
    color: #ffffff;
    width: 100%;
    height: 100%;
    text-align: center;
    line-height: 250px;
}
/* 4の倍数+1枚目のスライドのスタイル(1枚目、5枚目…) */
.swiper-slide:nth-child(4n+1) {
    background-color: #EECB27;
}
/* 4の倍数+2枚目のスライドのスタイル(2枚目、6枚目…) */
.swiper-slide:nth-child(4n+2) {
    background-color: #E13239;
}
/* 4の倍数+3枚目のスライドのスタイル(3枚目、7枚目…) */
.swiper-slide:nth-child(4n+3) {
    background-color: #1F1762;
}
/* 4の倍数+4枚目のスライドのスタイル(4枚目、8枚目…) */
.swiper-slide:nth-child(4n+4) {
    background-color: #BEDAE5;
}
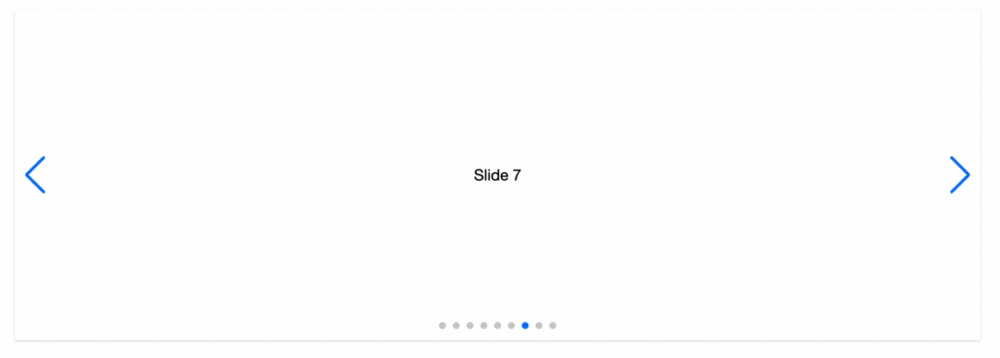
ではどのようになっているか、ブラウザで確認してみます。
ちゃんと動いてます。
せっかく前回、画像を複数登録できるアプリを作ったので、その画像を表示させてみます。
# show.html.slim

.swiper-container
  .swiper-wrapper
    - if @user.images.attached?
    - @user.images.each do |image|
      = image_tag image, class: 'swiper-slide'
これで確認してみます。

ちゃんと登録された画像が順番に表示されました。
最後に
そんなに難しいことではないんでしょうが、ライブラリやプラグインを入れるとなると少し身構えてしまいます。
便利なのは確かなので慣れていきたいです。
では今回は以上です。ありがとうございました。
参考サイト
Swiper - The Most Modern Mobile Touch Slider
サンプル付き!簡単にスライドを作れるライブラリSwiper.js超解説(基礎編) | ガリガリコード
swiperをyarnで導入して、画像をスライダー形式にする! - Qiita
jQueryで $ is not define エラーが出たときの一番簡単な解決法 | PisukeCode - Web開発まとめ
Active Storageで複数画像をアップロード
以前、Active Storageで画像をアップロードという記事を書いたのですが、
今回は複数の画像をアップロードしてみます。
準備
rails new images_app
cd images_app
rails g scaffold User name:string
rails newしてscaffoldします。
rails active_storage:install
でactive_storage_blobsとactive_storage_attachmentsの2つのテーブルが作成されるマイグレーションファイルが生成されるので
rails db:migrate
migrateします。
slimとsimple_formを使うのでGemfileにslim-rails、html2slim、simple_formを記述し、mini_magickも必要なのでコメントアウトを外します。
bundle install
して
bundle exec erb2slim app/views -d
でerbファイルをslimファイルに変換します。
これで準備OKです。
モデル
Userが画像を複数持てるようにしたいので
# user.rb

class User < ApplicationRecord
  has_many_attached :images
end
has_many_attachedで関係を設定します。
imagesの部分は任意の複数形の単語を名付けます。
コントローラ
imagesを受け取れるようにストロングパラメータを設定します。
def user_params
  params.require(:user).permit(:name, images: [])
end
permitにimages: []を追加しました。
複数の画像が送信された時、[]の中に配列の形で入ります。

ちょっと分かりづらいですが、
"images"=>[#<ActionDispatch::Http::UploadedFile:0x00007fcb8b360e08…
のところです。
次は複数アップロードされた画像を個別に削除できるようにしたいので、そのためのコントローラを作成します。
Userが持つファイルの制御なので、user/attachments_controller.rbとし、画像削除のためのdestroyアクションを作成します。
# user/attachments_controller.rb

class User::AttachmentsController < ApplicationController
  def destroy
    image = ActiveStorage::Attachment.find(params[:id])
    image.purge
    @user = User.find(params[:user_id])
    redirect_to user_path(@user)
  end
end
ActiveStorage::Attachment.find(params[:id])で画像を取ってきて、
purgeで削除です。
purgeはActiveStorageが用意しているメソッドで、添付ファイルを削除してくれます。
ルーティング
# routes.rb

Rails.application.routes.draw do
  root 'users#index'
  resources :users do
    resources :attachments, controller: 'user/attachments', only: %i[destroy]
  end
end
usersが持つattachments、という意味でネストさせています。
ビュー
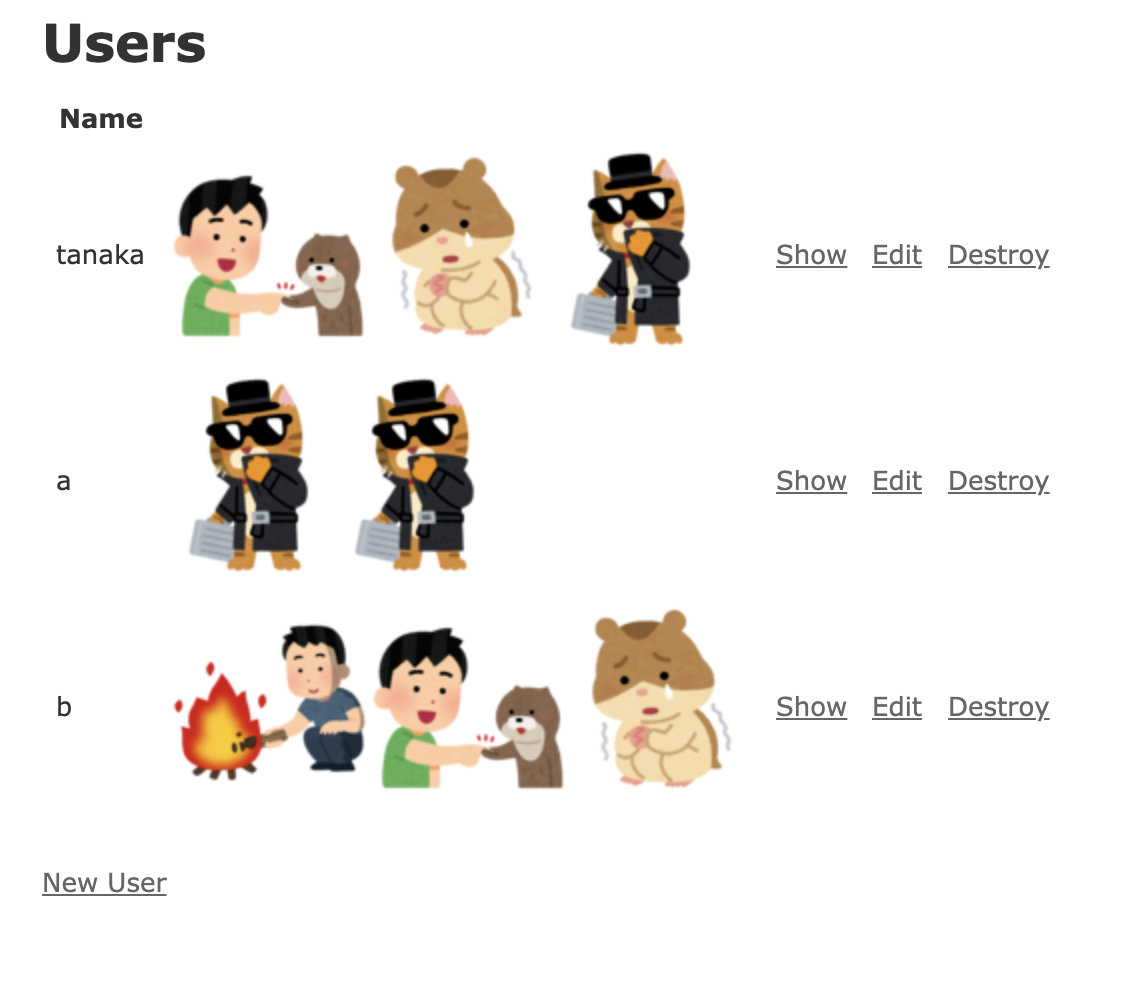
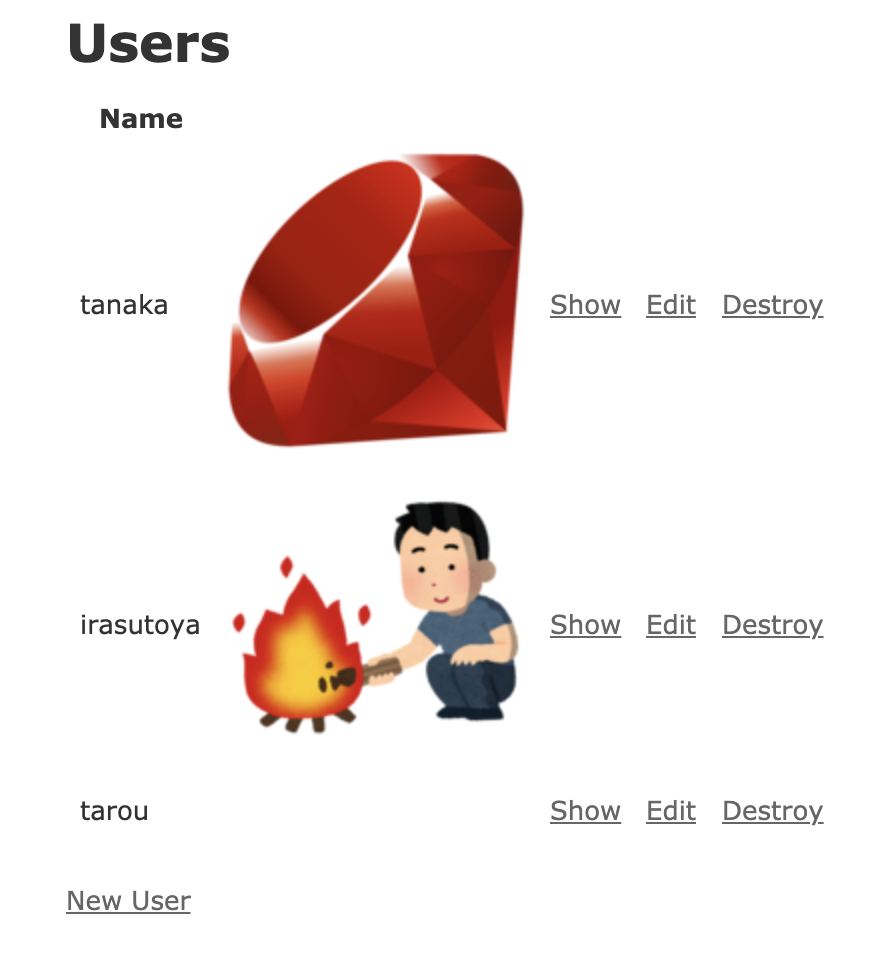
# index.html.slim

p#notice
  = notice
h1
  | Users
table
  thead
    tr
      th
        | Name
      th[colspan="3"]
  tbody
    - @users.each do |user|
      tr
        td
          = user.name
        td
          - if user.images.attached?
          - user.images.each do |image|
            = image_tag image.variant(resize:'100x100').processed
        td
          = link_to 'Show', user
        td
          = link_to 'Edit', edit_user_path(user)
        td
          = link_to 'Destroy', user, method: :delete, data: { confirm: 'Are you sure?' }
br
= link_to 'New User', new_user_path
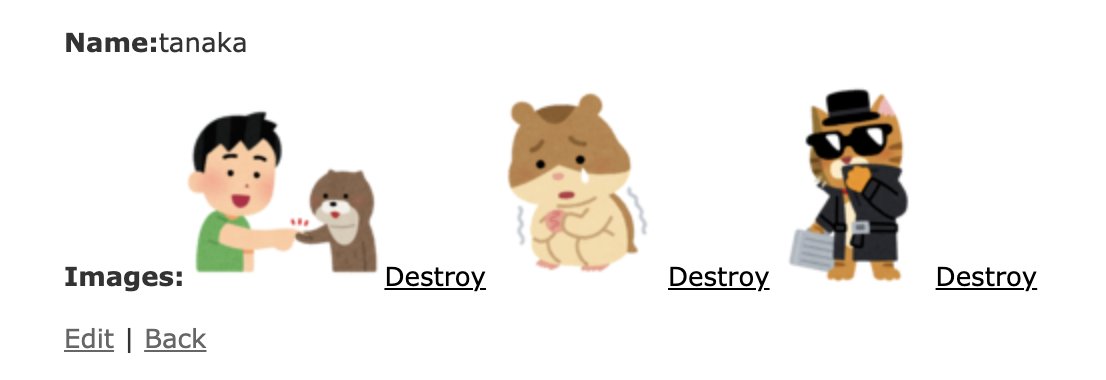
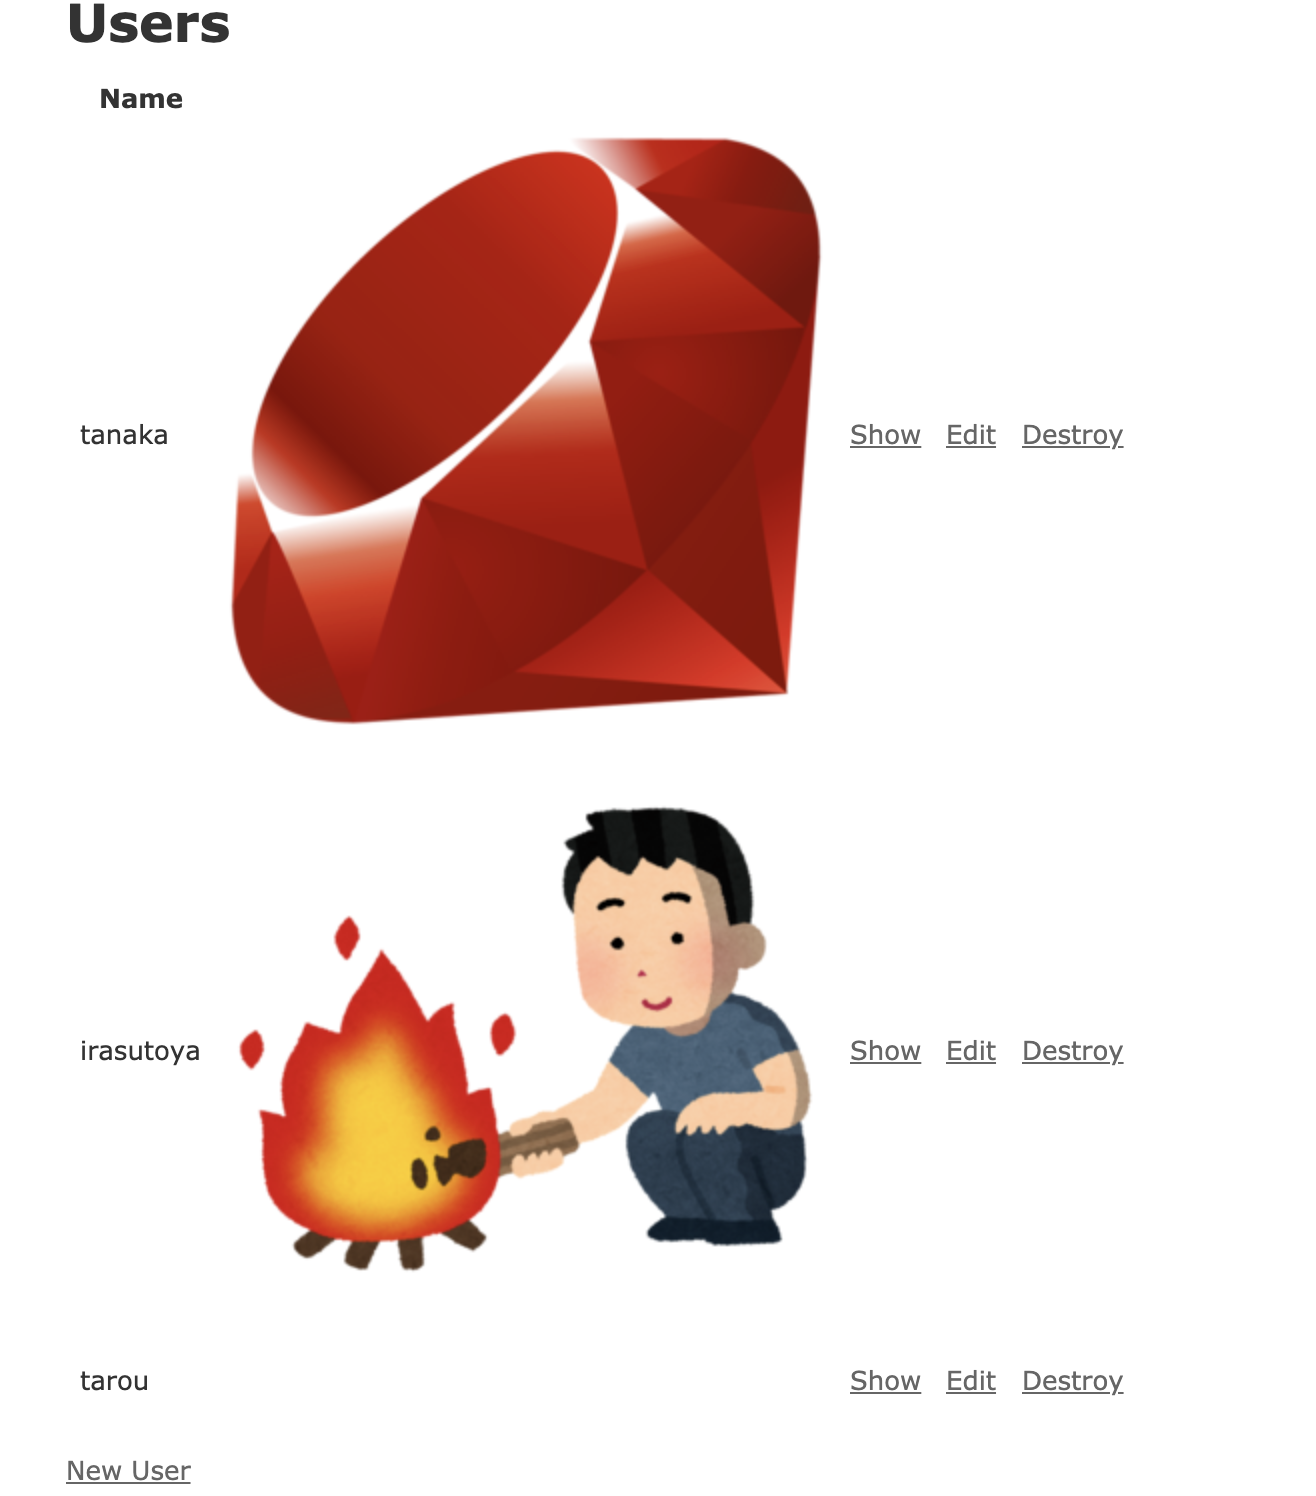
# show.html.slim

p#notice
  = notice
p
  strong
    | Name:
  = @user.name
p
  strong
    | Images:
  - if @user.images.attached?
  - @user.images.each do |image|
    = image_tag image.variant(resize:'100x100').processed
    = link_to 'Destroy', user_attachment_path(@user.id, image.id), method: :delete
= link_to 'Edit', edit_user_path(@user)
|  |
= link_to 'Back', users_path
# _form.html.slim

= simple_form_for user do |f|
  = f.error_notification
  = f.input :name
  = f.input :images, as: :file, input_html: { multiple: true }

  - if @user.images.attached?
  - @user.images.each do |image|
    = image_tag image.variant(resize:'100x100').processed
    = link_to 'Destroy', user_attachment_path(@user.id, image.id), method: :delete
  br
  = f.button :submit, 'Submit'
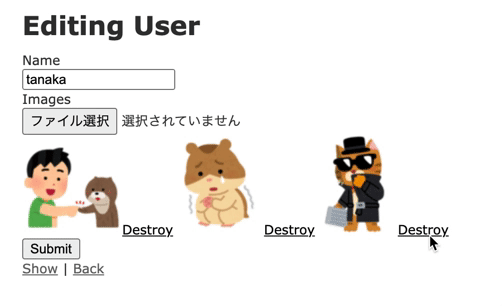
複数画像のアップロード、個別の削除ができました。
最後に
attachments_controllerの中で@userを定義してないのにredirect_toのpathの引数に@userを入れたり、
画像の個別削除のlink_toのpathの引数を間違ってたり、
初歩的なところでつまづいて時間が溶けてしまいました。
解決した後に冷静になってみればわかるんですけどね…
では今回は以上です。ありがとうございました。
参考サイト
youtube、twitterの埋め込み
アプリにyoutube動画とtwitterのtweetを表示させてみました。
APIを使う方法とローカルで埋め込む方法がありますが、今回はローカルで埋め込む方法でやっていきます。
レイアウトが崩れてますが完成形はこんな感じです。
ではアプリの新規作成からやっていきましょう。
rails new embed_app
cd embed_app
で新規作成、移動したら
rails g scaffold Article title:string youtube_url:string twitter_url:string
rails db:migrate
scaffoldしてmigrateします。
viewはslimで書くのでgem slim-rails、html2slimを入れてます。
youtubeの埋め込み
まずはyoutubeからいきます。
記事詳細ページに埋め込みたいのでshow.html.slimを編集しましょう。
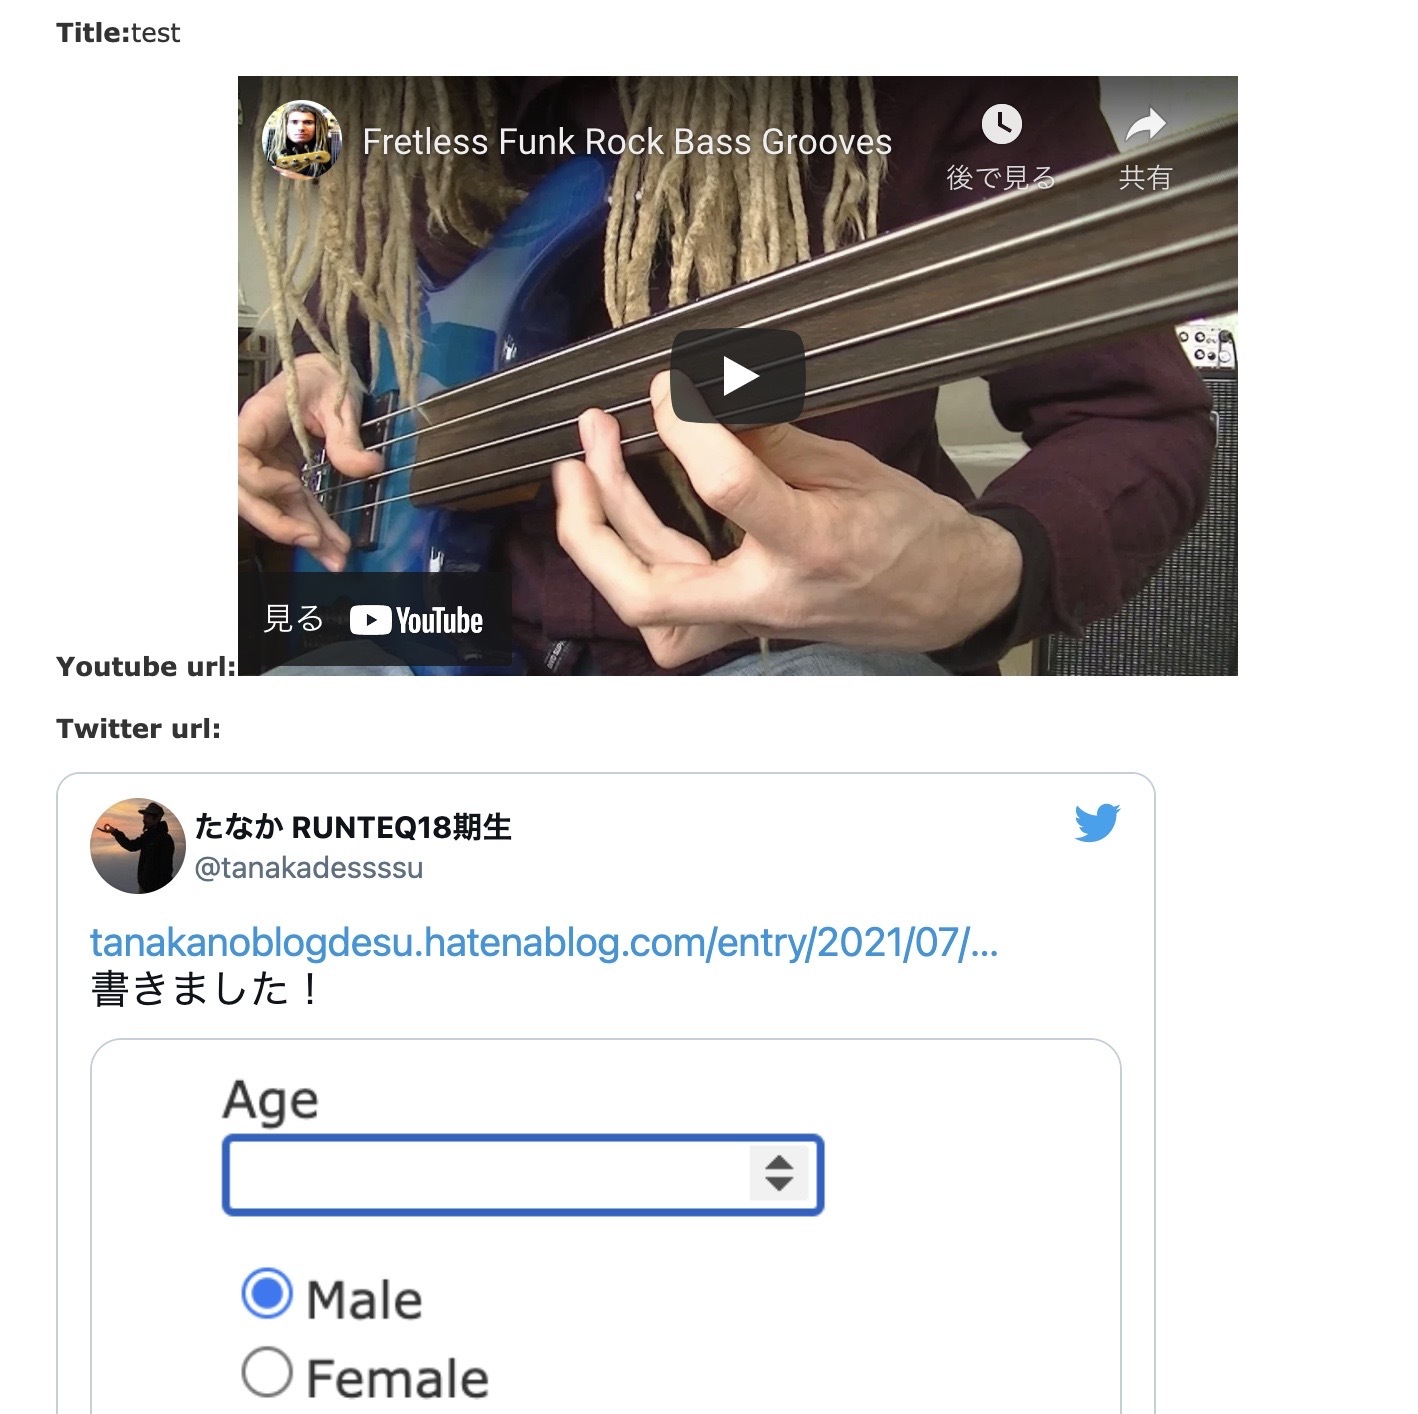
p#notice = notice

p
  strong Title:
  = @article.title
p
  strong Youtube url:
  .embed-youtube
  = content_tag 'iframe', nil, width: 560, height: 315, src: "https://www.youtube.com/embed/#{@article.split_id_from_youtube_url}", \
    frameborder: 0, gesture: 'media', allow: 'encrypted-media', allowfullscreen: true
p
  strong Twitter url:
  = @article.twitter_url

=> link_to 'Edit', edit_article_path(@article)
'|
=< link_to 'Back', articles_path
youtube動画の埋め込みはこんな感じです。
srcの@article.split_id_from_youtube_urlですが、モデルで
class Article < ApplicationRecord
  def split_id_from_youtube_url
    youtube_url.split('/').last
  end
end
こんなメソッドを定義しています。
splitメソッドで、受け取ったyoutube_urlを引数で指定した「/」で区切り、配列に入れています。
lastメソッドでその配列の一番後ろのものを取得しています。
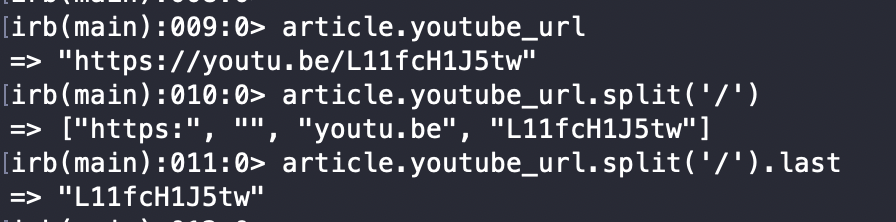
配列の一番後ろはyoutube動画の固有のIDである、11桁の英数字です。
動画の「共有」をクリックすると下のような共有用URLが表示されます。
https://youtu.be/L11fcH1J5tw
これをフォームに入力するとsplit_id_from_youtube_urlメソッドが動画のIDを切り出して
https://www.youtube.com/embed/L11fcH1J5tw
という形に変換してくれます。
(動画を埋め込む際はhttps://www.youtube.com/embed/動画IDという形式にする必要があります)
しかし
https://www.youtube.com/watch?v=L11fcH1J5tw
のような形式を入力するとうまく動画を埋め込むことができません。
先程のメソッドに当てはめるとwatch?v=L11fcH1J5twが取得されて
https://www.youtube.com/embed/watch?v=L11fcH1J5tw
というURLになってしまうからです。
そこでif文でこのように分岐させてみました。(もうちょっといい感じに書けそうですがうまくリファクタリングできませんでした)
strong Youtube url:
.embed-youtube
- if @article.youtube_url.include?('watch?v=')
  = content_tag 'iframe', nil, width: 560, height: 315, src: "https://www.youtube.com/embed/#{@article.youtube_url.last(11)}", \
    frameborder: 0, gesture: 'media', allow: 'encrypted-media', allowfullscreen: true
- else
  = content_tag 'iframe', nil, width: 560, height: 315, src: "https://www.youtube.com/embed/#{@article.split_id_from_youtube_url}", \
    frameborder: 0, gesture: 'media', allow: 'encrypted-media', allowfullscreen: true
動画のURLをそのままコピペしたらif、共有URLをコピペしたらelseに分岐して、
どちらのパターンでも動画が埋め込みできるようになりました。
twitterの埋め込み
次はtwitterの埋め込みです。
  .embed-twitter
    blockquote.twitter-tweet
      a href="#{@article.twitter_url}"
  script async="" charset="utf-8" src="https://platform.twitter.com/widgets.js"
こんな感じです。
https://publish.twitter.comのフォームにツイートのURLを入力すると埋め込み用のコードがコピーできます。
それをslim記法に直して必要なものだけ取り出したのが上記のコードです。
ただしhref属性を動的に変えるため"#{@article.twitter_url}"としています。
最終的なコードがこちらです。
p#notice = notice

p
  strong Title:
  = @article.title
p
  strong Youtube url:
  .embed-youtube
  - if @article.youtube_url.include?('watch?v=')
    = content_tag 'iframe', nil, width: 560, height: 315, src: "https://www.youtube.com/embed/#{@article.youtube_url.last(11)}", \
      frameborder: 0, gesture: 'media', allow: 'encrypted-media', allowfullscreen: true
  - else
    = content_tag 'iframe', nil, width: 560, height: 315, src: "https://www.youtube.com/embed/#{@article.split_id_from_youtube_url}", \
      frameborder: 0, gesture: 'media', allow: 'encrypted-media', allowfullscreen: true
p
  strong Twitter url:
  .embed-twitter
    blockquote.twitter-tweet
      a href="#{@article.twitter_url}"
  script async="" charset="utf-8" src="https://platform.twitter.com/widgets.js"

=> link_to 'Edit', edit_article_path(@article)
'|
=< link_to 'Back', articles_path
最後に
無事、埋め込むことができました。
youtubeやtwitterの埋め込みは汎用性が高そうですね。
今回は以上です。ありがとうございました。
参考サイト
【Rails】YoutubeとTwitterをAPIを使わずに記事に埋め込む - Ruby on Rails Learning Diary
simple_form
simple_formとは
入力フォームを簡単に作成できるgemです。
導入方法
Gemfileに
gem 'simple_form'
としてbundle installします。
rails g simple_form:install

bootstrapを適用したい場合は下記
rails g simple_form:install --bootstrap
こちらのコマンドを実行します。
フォームを作成
あとはviewファイルにフォームを作成するだけです。
# slimで書いてます

= simple_form_for user do |f|
  .field
    = f.input :name
  .field
    = f.input :age
  .field
    = f.input_field :gender, as: :radio_buttons
  .field
    = f.input :birthday, start_year: Time.now.year, end_year: Time.now.year-100
  .actions
    = f.button :submit

# schema
t.string :name, null: false
t.integer :age
t.integer :gender, null: false, default: 0 # enum :gender { male: 0, female: 1 }
t.date :birthday

t.timestamps
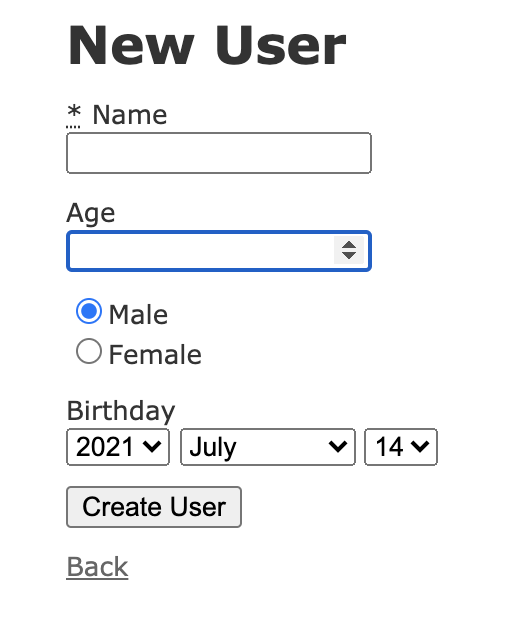
こんな感じでシンプルにフォームを作ることができます。
オプション色々
オプションを付けることで色々できます。
・ラベルを変更
= f.input :name, label: '名前'

・ラベルを非表示に
= f.input :name, label: false

・エラー文をカスタマイズ
= f.input :name, error: 'エラー文をカスタマイズ'

・ヒントを表示
= f.input :name, hint: 'ヒントを表示'

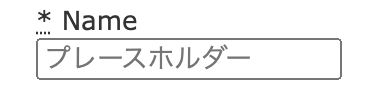
・プレースホルダーを表示
= f.input :name, placeholder: 'プレースホルダー'
asオプションではHTMLのtypeを変えることができます。
・チェックボックス
= f.input :name, as: :boolean


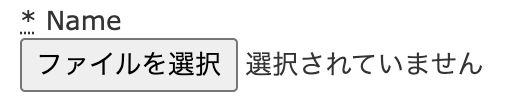
・ファイル
= f.input :name, as: :file

まあnameカラムにこんなの付けないですね、苦しい例ですみません…
as: :オプションでtypeが変えられるのは分かって頂けたかと思います。
最後に
と、こんな感じで色々とできます。
その名の通りシンプルなので分かりやすく、form_withより記述量が減るので便利ですね。
今回は以上です。ありがとうございました。
参考サイト
Active Storageで画像をアップロード
Active Storageとは
ファイルアップロードを簡単に実装できるgemです。
railsの標準のgemで、rails5.2から追加されました。
scaffoldアプリの作成
rails new active_storage_app
名前はactive_storage_appとしておきます。
rails newしたら
cd active_storage_app
で移動して
rails g scaffold User name:string
rails db:migrate
scaffoldで元になるアプリを作成します。
Active Storageの導入
rails active_storage:install
このコマンドでactive_storage_blobsとactive_storage_attachmentsの2つのテーブルが作成されるマイグレーションファイルが生成されるので
rails db:migrate
とします。
active_storage_blobsはアップロードしたファイルを保存するテーブルで
active_storage_attachmentsは中間テーブルです。
一人のユーザーに対して一枚のアバター画像をもつ1対1の関係のとき、
モデルにhas_one_attached :カラム名を記述します。
class User < ApplicationRecord
  has_one_attached :avator
end
カラム名、と言いましたが、usersテーブルにはnameカラムしか作っていませんでした。
しかし、わざわざマイグレーションファイルを作成してavatorカラムを追加して…としなくても、
has_one_attachedを書くだけで大丈夫です。
画像サイズの設定
画像以外に、画像のサイズを設定できるようにもしたいので、
rails g migration add_avator_width_to_users
でマイグレーションファイルを作成し、
class AddAvatorWidthToUsers < ActiveRecord::Migration[5.2]
  def change
    add_column :users, :avator_width, :integer
  end
end
usersテーブルにinteger型のavator_widthカラムを追加し、
rails db:migrate
とします。
画像のサイズはvalidationで100px~500pxに制限しておきます。
また、avator_widthを空欄で登録しようとすると弾かれてしまうのでallow_nil: trueも書いておきます。
class User < ApplicationRecord
  has_one_attached :avator
  validates :avator_width,  numericality: { greater_than_or_equal_to: 100, less_than_or_equal_to: 500 }, allow_nil: true
end
コントローラのストロングパラメータでは
class UsersController < ApplicationController

 # 略

    def user_params
      params.require(:user).permit(:name, :avator, :avator_width)
    end
end
avatorとavator_widthをpermitしておきます。
viewを整形
viewの方も整えていきます。
画像ファイルと画像サイズのフォームを作成し
_form.html.erb

<%= form_with(model: user, local: true) do |form| %>
  <% if user.errors.any? %>
    <div id="error_explanation">
      <h2><%= pluralize(user.errors.count, "error") %> prohibited this user from being saved:</h2>

      <ul>
      <% user.errors.full_messages.each do |message| %>
        <li><%= message %></li>
      <% end %>
      </ul>
    </div>
  <% end %>

  <div class="field">
    <%= form.label :name %>
    <%= form.text_field :name %>
  </div>

  <div class='field'>
    <%= form.label :avator %>
    <%= form.file_field :avator %>
  </div>

  <div class='field'>
    <%= form.label :avator_width %>
    <%= form.number_field :avator_width %>
  </div>


  <div class="actions">
    <%= form.submit %>
  </div>
<% end %>
ユーザー詳細ページでそれを表示させます。
show.html.erb

<p id="notice"><%= notice %></p>

<p>
  <strong>Name:</strong>
  <%= @user.name %>
</p>

<% if @user.avator.attached? %>
  <%= image_tag @user.avator, width: @user.avator_width %>
<% end %>

<%= link_to 'Edit', edit_user_path(@user) %> |
<%= link_to 'Back', users_path %>
attached?メソッドはhas_one_attachedを設定することで使えるメソッドです。
userがavatorを持っていればtrueを、持っていなければfalseを返します。
ユーザー詳細ページを見てみると
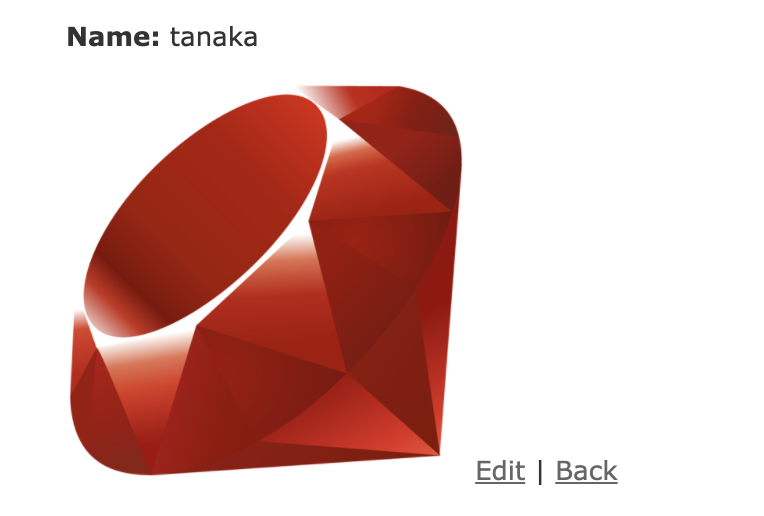
ちゃんと画像が表示されていますね。
画像サイズを調整
ユーザー詳細ページのアバター画像には、フォームに入力した画像サイズが適用されています。
ユーザー一覧ページにもアバターを表示させたいですが、小さいサイズに調整したいです。
画像処理ツールのImageMagick、ImageMagickをrailsで使うためのgem、mini_magickを使います。(ImageMagickのインストール方法は省略します)
Gemfileにmini_magickがコメントアウトされていると思うので、コメントアウトを外してbundle installしたら、
ユーザー一覧ページを編集して、サイズ調整した画像を表示させましょう。
<p id="notice"><%= notice %></p>

<h1>Users</h1>

<table>
  <thead>
    <tr>
      <th>Name</th>
      <th colspan="3"></th>
    </tr>
  </thead>

  <tbody>
    <% @users.each do |user| %>
      <tr>
        <td><%= user.name %></td>
        <td><%= image_tag user.avator.variant(resize: '50x50').processed if user.avator.attached? %></td>
        <td><%= link_to 'Show', user %></td>
        <td><%= link_to 'Edit', edit_user_path(user) %></td>
        <td><%= link_to 'Destroy', user, method: :delete, data: { confirm: 'Are you sure?' } %></td>
      </tr>
    <% end %>
  </tbody>
</table>

<br>

<%= link_to 'New User', new_user_path %>
variant(resize: 50x50)で画像サイズを変換しています。
processedはすでにそのサイズで保存されている画像があれば変換処理は行われず、すぐにURLが返されます。
最初の呼び出しだけ多少時間がかかりますが、それ以降の呼び出しでは時間がかかることはありません。
ではユーザー一覧ページを見てみましょう。
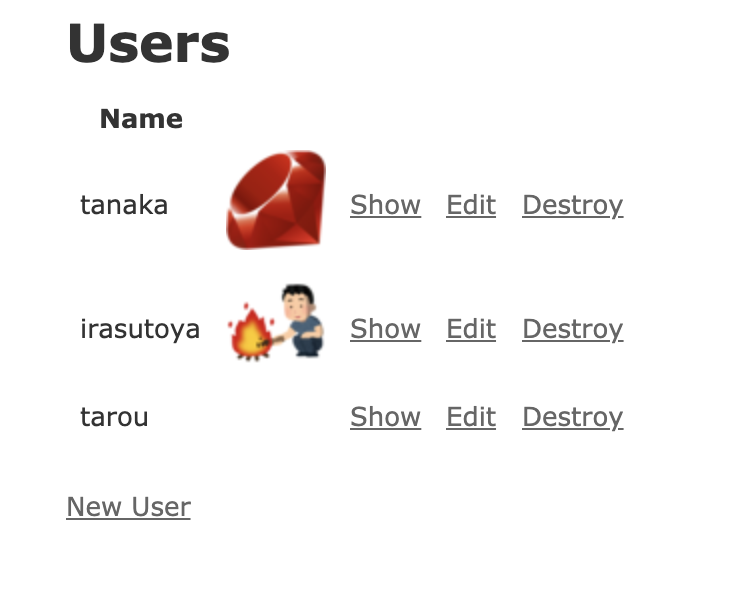
画像サイズが変換されて表示されていますね。
しかしもしアプリの機能が増えて色んなページで画像を表示するとなったときに書き換えるのが大変です。
Decoratorを使って表示に関する処理を切り出してみます。
gem ActiveDecoratorを導入
Gemfile

gem 'active_decorator'
としてbundle installします。
次にでUserモデルに対するdecoratorを作成します。
rails g decorator user
このコマンドでapp/decorators/user_decorator.rbというファイルが生成されました。
このファイルにviewで呼び出すメソッドを書いていきます。
module UserDecorator
  def avator_url(version = :origin)

    command = case version
              when :small
                { resize: '50x50' }
              when :midium
                { resize: '150x150' }
              when :large
                { resize: '300x300' }
              else
                false
              end

    command ? avator.variant(command).processed : avator
  end
end
viewで呼び出す際は
<%= image_tag user.avator_url(:midium) if user.avator.attached? %>
このようにすることで引数によってサイズを変えることができます。
<%= image_tag user.avator_url(:large) if user.avator.attached? %>
これなら引数を変えてあげるだけですね。
最後に
実際にrails newから作ってみると理解しやすかったです。
小さなアプリだとあまり恩恵がないですが規模が大きくなるほどメンテナンス性などを考える必要がありそうです。
最後まで読んでいただきありがとうございました。
参考サイト
【Rails】 Active | Pikawaka - ピカ1わかりやすいプログラミング用語サイト
Active StorageのVariantの指定方法いろいろ - Qiita
【Ruby on Rails】Gem「ActiveDecorator」の紹介 View向けのメソッドを定義する - ざきの学習帳(旧 zackey推し )
Punditで権限管理
ユーザーによってページの表示を許可、拒否したり、アクションを制限したりしたいことがあると思います。
今回は認可の仕組みを提供してくれるgem Punditを使って実装してみたいと思います。
単純なuserのCRUD機能とログイン機能を持ったアプリを作りました。
userはadmin(管理者)とgeneral(一般ユーザー)の2種類います。
adminがログインした時には制限はありませんが、generalがログインした時はユーザーの編集、削除ができないようにしてみます。
adminであるtanakaでログインすると
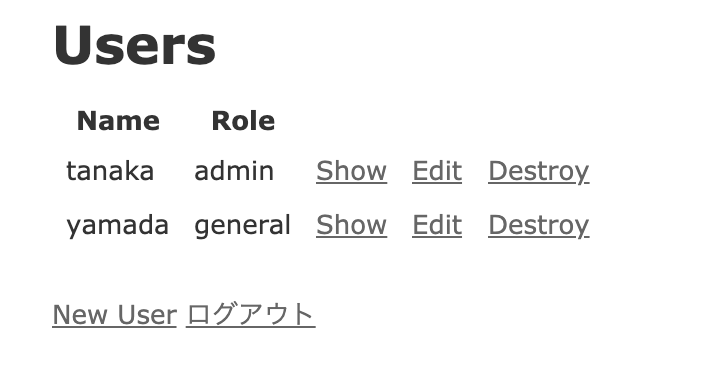
こんな感じです。
generalのyamadaでログインしても今は同じ画面になります。
Punditを導入してgeneralができることを制限してみましょう。
Punditの導入
Gemfileに
gem 'pundit'
としてbundle installして、コントローラでincludeします。
class ApplicationController < ActionController::Base
  include Pundit
end
下記のコマンドで
rails g pundit:install
app/policies/配下にapplication_policy.rbが作成されます。
class ApplicationPolicy
  attr_reader :user, :record

  def initialize(user, record)
    @user = user
    @record = record
  end

  def index?
    false
  end

  def show?
    false
  end

  def create?
    false
  end

  def new?
    create?
  end

  def update?
    false
  end

  def edit?
    update?
  end

  def destroy?
    false
  end

  class Scope
    attr_reader :user, :scope

    def initialize(user, scope)
      @user = user
      @scope = scope
    end

    def resolve
      scope.all
    end
  end
end
Policyの作成
userに関するpolicy(方針)を記述するファイルuser_policy.rbを作成し、
class UserPolicy < ApplicationPolicy
  def index?
    true
  end

  def edit?
    user.admin?
  end
end
ApplicationPolicyを継承させ、アクションを定義します。
admin?はenumで
class User < ApplicationRecord
  enum role: { general: 0, admin: 1 }
end
このように定義して使えるようになったメソッドです。
def アクション名? endで認可ルールを記述します。
def index?
  true
end

def edit?
  user.admin?
end
index?はtrueが返るので制限はかかりません。
edit?にはuserがadminの場合に許可しtrueが返ります。
userにはデフォルトでcurrent_userが入るようになっているみたいです。
adminでなければPundit::NotAuthorizedErrorが発生します。
コントローラでPunditを呼び出し
コントローラ側で
class UsersController < ApplicationController
  before_action :set_user, only: %i[ show edit update destroy ]

  def index
    authorize(User)
    @users = User.all
  end

  def edit
    authorize(@user) # 編集は特定のユーザー情報が必要なので「@user」で特定のユーザーを引数に指定
  end

  private

  def set_user
    @user = User.find(params[:id])
  end
end
authorizeメソッドを記述することで該当するPolicy(この場合UserPolicy)を確認してくれます。
indexアクションからはindex?アクションを確認し、index?アクションはtrueを返すのでadminでもgeneralでもユーザー一覧が表示されます。
editアクションからはedit?アクションを確認し、edit?アクションはuser.admin?となっているのでadminの場合だけtrueが返り、編集ページへアクセスできます。
Viewで表示を制限
View側でもpolicyメソッドを使って表示自体を制限できます。
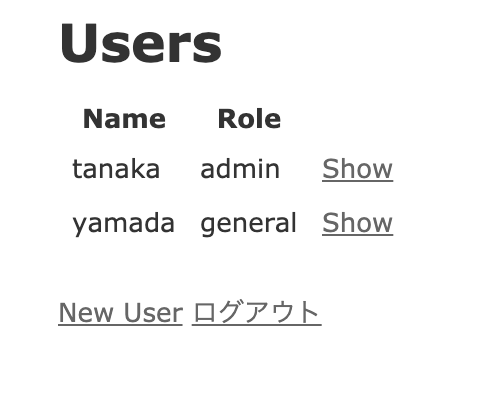
<% @users.each do |user| %>
  <tr>
    <td><%= user.name %></td>
    <td><%= user.role %></td>
    <td><%= link_to 'Show', user %></td>
    <% if policy(user).edit? %>
      <td><%= link_to 'Edit', edit_user_path(user) %></td>
    <% end %>
    <% if policy(user).destroy? %>
      <td><%= link_to 'Destroy', user, method: :delete, data: { confirm: 'Are you sure?' } %></td>
    <% end %>
  </tr>
<% end %>
このようにすると「Edit」「Destroy」のリンク自体、adminでログインしている場合でないと表示されなくなります。
もしusers/1/editのように直接URLからアクセスしようとしても
def edit?
  user.admin?
end
これにより弾くことができます。
Pundit::NotAuthorizedError
権限がないgeneralで編集ページにアクセスしようとするとPundit::NotAuthorizedErrorが発生します。

エラーページを用意してそちらを表示させることができます。
public配下に403.htmlファイルを作成します。
<!DOCTYPE html>
<html>
<head>
  <title>権限がありません</title>
  <meta name="viewport" content="width=device-width,initial-scale=1">
</head>

<body>
  <p>権限がありません。</p>
</body>
</html>
そしてapplication_controller.rbを
class ApplicationController < ActionController::Base
  include Pundit

  rescue_from Pundit::NotAuthorizedError, with: :user_not_authorized # これと

  private

  def user_not_authorized #これを追加
    render file: 'public/403.html', status: :forbidden, layout: false
  end
end
このようにします。
わざとエラーを発生させると

エラーページに遷移しました。
また、config/application.rbにconfig.action_dispatch.rescue_responses["Pundit::NotAuthorizedError"] = :forbiddenの記述をし、
config/environments/development.rbのconfig.consider_all_requests_localをtrueからfalseに変更してサーバーを再起動することでもエラーページに遷移できました。
最後に
動作確認しながら書きましたが、最低限だけ書こうとして端折ったところもあるのでもしかしたら矛盾があるかもしれません。
あったらごめんなさい。
今回は以上です。ありがとうございました。
参考サイト
GitHub - varvet/pundit: Minimal authorization through OO design and pure Ruby classes
FormObject
FormObjectについて学んだのでまとめてみます。
FormObjectとは
form_withのmodelにActiveRecord以外のオブジェクトを渡すデザインパターン(設計手法)です。
メリットとしては
・DBを使わないフォームでも、ActiveRecordを利用した場合と同じお作法を利用できるので可読性が増す
・他の箇所に分散されがちなロジックをFormObject内に集めることができる
などがあるようです。
RailsでDBのレコードにアクセスする際、生のSQLではなくActiveRecordが提供するクエリメソッドを使います。
User.allとかUser.find(1)とかですね。
これはモデルクラスがApplicationRecordを、ApplicationRecordがActiveRecord::Baseを継承しているから使えるものです。
ではモデルに紐づかないクラス、つまりActiveRecordを継承しないクラスを作りたい時はどうするか。
DBに保存する必要はないがActiveRecordの機能は使いたい、という場合にどうするか、記事の検索フォームを例に見てみます。
検索フォーム
# view

= form_with model: @search_articles_form, scope: :q, url: admin_articles_path, method: :get, html: { class: 'form-inline' } do |f|
  => f.select :author_id, Author.pluck(:name, :id) , { include_blank: '著者' }, class: 'form-control'
  .input-group
    = f.search_field :title, class: 'form-control', placeholder: 'タイトル'
# controller

def index
  authorize(Article)

  @search_articles_form = SearchArticlesForm.new(search_params)
  @articles = @search_articles_form.search.order(id: :desc).page(params[:page]).per(25)
end

private

def search_params
  params[:q]&.permit(:title, :author_id)
end
検索のロジックを書くapp/forms/search_article_form.rbをいうファイルを作成し、その中でActiveModel::Modelをincludeします。
コントローラーから切り出すことでFatControllerを防ぎます。
class SearchArticlesForm
  include ActiveModel::Model # これ
  include ActiveModel::Attributes

  attribute :author_id, :integer
  attribute :title, :string

  def search
    relation = Article.distinct

    relation = relation.by_author(author_id) if author_id.present?
    title_words.each do |word|
      relation = relation.title_contain(word)
    end
    relation
  end

  private

  def title_words
    title.present? ? title.split(nil) : []
  end
end
# model

class Article < ApplicationRecord
# 略
  scope :by_author, ->(author_id) { where(author_id: author_id) }
# 略
ActiveModelはActiveRecordの中でデータベースに関連する部分以外の機能を切り出したモジュールです。
これをincludeすることでActiveRecordを継承していないクラスでもActiveRecordの便利な機能が使えるようになります。
また、include ActiveModel::AttributesとありますがこれはActiveRecordにあるAttribute APIという機能を使うためのものです。
Attribute APIはActiveRecordを操作する際にクラス属性の型を意識しなくても、指定の型へ変換してくれています。
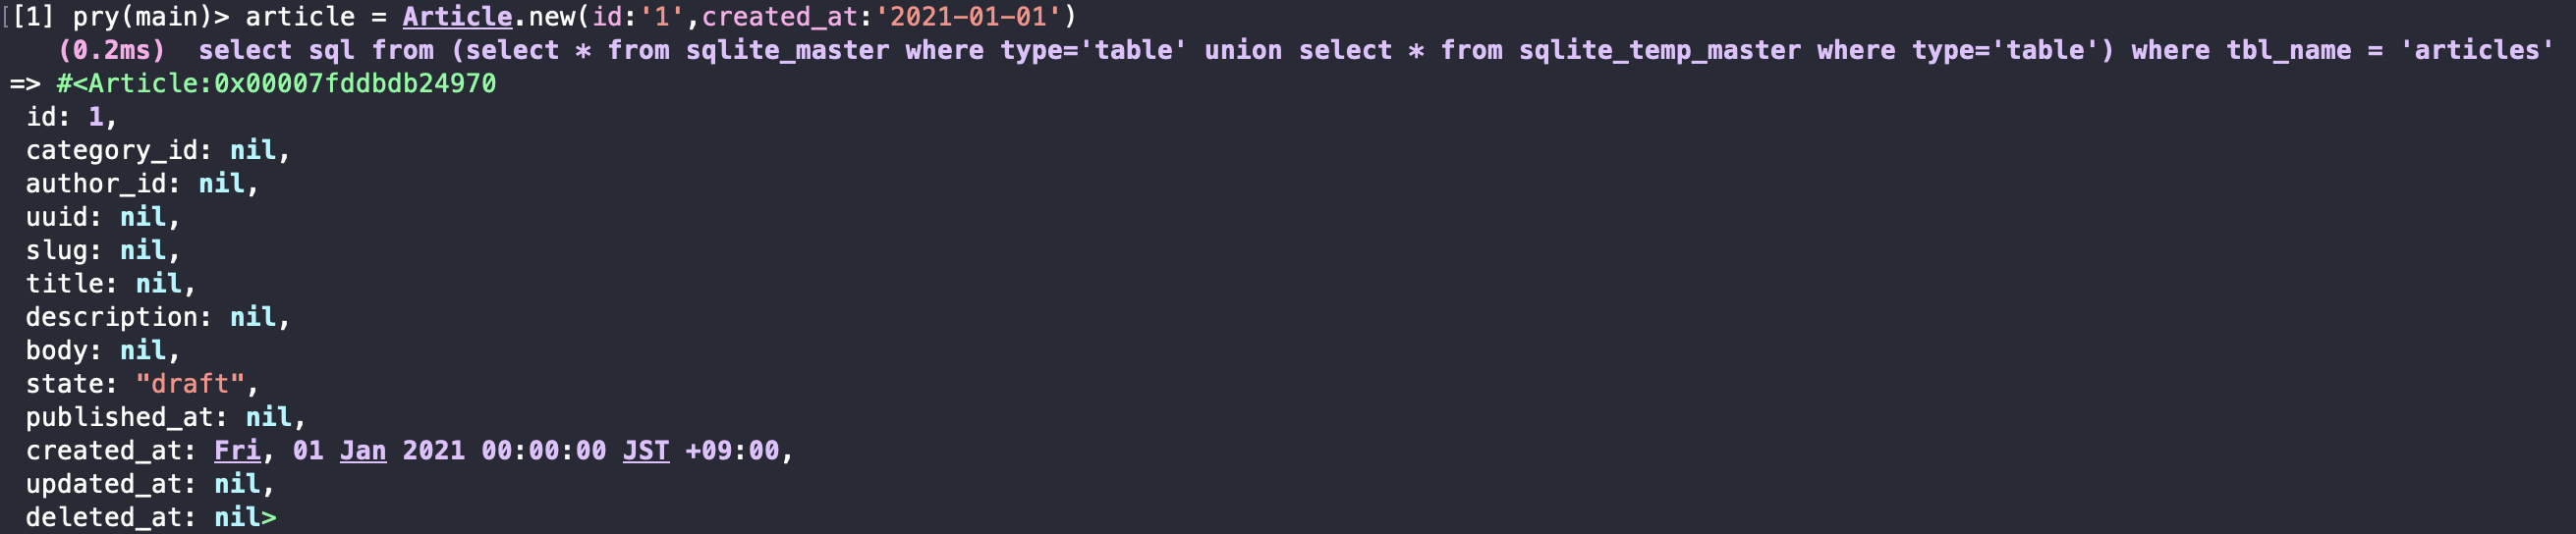
このようにid、created_atを文字列で渡しましたが型が変換されています。
このActiveModel::Attributesをincludeしてattribute :属性, 型とすることで属性、型を定義できます。
最後に
FormObjectをうまく使うとコントローラの肥大化を防げそうです。
何でもかんでもコントローラに詰め込まず、上手に切り出して可読性の高いコードを書けるようになりたいです。
参考サイト
form objectを使ってみよう - メドピア開発者ブログ
【Rails】FormObject で Controller を綺麗に - stmn tech blog
ActiveModel とActiveModel::Attributes について - WeBlog